As the Admin of ToasterFood.com, with a decade of expertise in toaster mechanics, performance, and product selection, I understand the desire for a pristine kitchen appliance. Toasters, while seemingly simple, are essential in our daily routines, and ensuring they remain clean is key to their longevity and the quality of your toast. While the idea of a “deep clean” might conjure images of fully dismantling your toaster, the reality for most home users, and indeed for the toaster’s health, is quite different. True deep cleaning can often be achieved effectively and safely without taking your beloved toaster apart. In this guide, we’ll explore the safest and most efficient ways to keep your toaster sparkling, clarifying when disassembly might be a consideration – typically for repair, not routine cleaning – and why professional judgment is paramount.
Understanding Toaster Cleaning Levels
Maintaining a toaster involves different levels of cleaning, each suited for varying degrees of use and debris. Knowing when to apply which method is crucial for both effectiveness and safety.
Basic Cleaning: Regular Maintenance for Everyday Use
|
Our Picks for the Best Toaster in 2026
As an Amazon Associate I earn from qualifying purchases.
|
||
| Num | Product | Action |
|---|---|---|
| 1 | KEYWIND VTG RIC DELUXE LONG SE |

|
| 2 | bella 2 Slice Slim Toaster, Fits-anywhere™ Kitchenware, 6 Setting Shade Control with Reheat & Cancel Buttons, Fits sourdough, 10” Long Slot, Anti Jam & Auto Shutoff, 900 Watt, Plum |
|
| 3 | Elite Gourmet ECT1027B Cool Touch Toaster with 6 Temperature Settings & Extra Wide 1.25" Slots for Bagels, Waffles, Specialty Breads, Puff Pastry, Snacks, ETL Certified, 2 Slices, Black |
|
| 4 | bella 2 Slice Slim Toaster, Fits-anywhere™ Kitchenware, 6 Setting Shade Control with Reheat & Cancel Buttons, Fits Sourdough, 10” Long Slot, Anti Jam & Auto Shutoff, 900 Watt, Seaglass |
|
| 5 | bella 2 Slice Slim Toaster, Fits-anywhere™ Kitchenware, 6 Setting Shade Control with Reheat & Cancel Buttons, Fits sourdough, 10” Long Slot, Anti Jam & Auto Shutoff, 900 Watt, Oatmilk |
|
| 6 | Amazon Basics 2 Slice Toaster, With 6 Browning Settings, Extra Wide Slots For Bagels and Special Breads, Removable Easy-to-Clean Crumb Tray, Cancel/Defrost/Bagel Buttons, 900W, Black & Silver |
|
| 7 | Touch Screen Toaster - 4 Slice, 2 Extra Long Slots - 5 Bread Types and 6 Browning Levels - Defrost, Reheat, Favorite, & Single Slot Modes - For Toast, Bagels, & Waffles – White |
|
| 8 | bella 2 Slice Slim Toaster, Fits-anywhere™ Kitchenware, 6 Setting Shade Control with Reheat & Cancel Buttons, Fits sourdough, 10” Long Slot, Anti Jam & Auto Shutoff, 900 Watt, Blossom |
|
| 9 | bella 2 Slice Slim Toaster, Fits-anywhere™ Kitchenware, 6 Setting Shade Control with Reheat & Cancel Buttons, Fits Sourdough, 10” Long Slot, Anti Jam & Auto Shutoff, 900 Watt, Surf |
|
| 10 | STRING SET BASS STD 45w 55w 75w 105w |
|
Basic cleaning is your first line of defense against crumb buildup and grime. This routine should be performed frequently, ideally after every few uses or at least once a week for daily users. It’s simple, quick, and helps prevent larger issues. The core of basic cleaning involves emptying the crumb tray and wiping down the exterior. This prevents crumbs from accumulating, which can become a fire hazard or lead to unpleasant odors if left to burn. Always unplug your toaster and allow it to cool completely before starting.
Deep Cleaning (Without Disassembly): Thorough Care for Optimal Performance
When your toaster needs more than just a quick wipe, a deep clean without full disassembly is the next step. This method targets those harder-to-reach crumbs and minor sticky residues that accumulate over time. It’s far more thorough than basic cleaning but still prioritizes safety by avoiding the internal electrical components. This type of deep cleaning is what most home users can and should perform periodically to ensure their toaster remains hygienic and functions optimally without compromising its integrity.
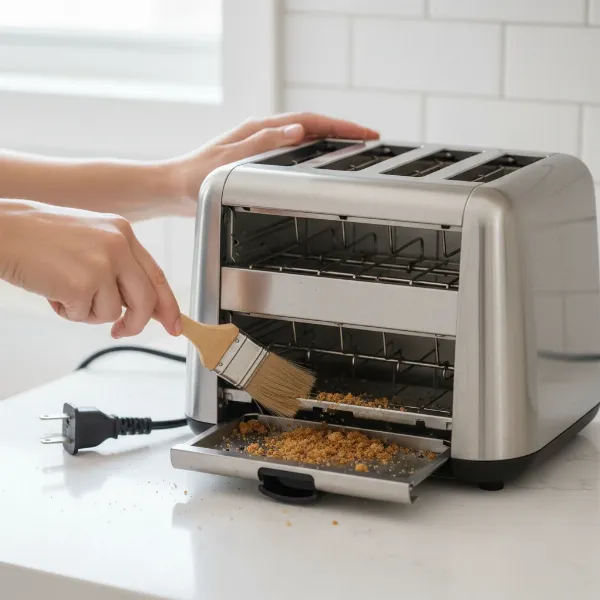 A person safely deep cleaning a toaster without disassembly, emphasizing brush and crumb tray.
Disassembly: The Expert’s Domain and Why It’s Not for Cleaning
The term “disassemble” often implies taking an appliance entirely apart, exposing its internal workings. For a toaster, this typically involves removing the outer casing to access heating elements, wiring, and the mechanical lowering/raising mechanism. From an expert’s perspective, full disassembly of a toaster is almost exclusively reserved for repairs, troubleshooting complex issues, or for recycling purposes where components need to be separated. It is emphatically not a recommended procedure for routine deep cleaning. The internal components are delicate, often held by specialized fasteners, and can be dangerous due to residual electrical charge or sharp edges. Attempting to disassemble a toaster for cleaning can easily lead to damage, electric shock, or render the appliance inoperable, often voiding any warranty.
Deep Cleaning Your Toaster Safely and Effectively (Without Full Disassembly)
Achieving a truly clean toaster doesn’t require complex tools or risky disassembly. With the right approach and a focus on safety, you can thoroughly clean your appliance and extend its life.
Essential Safety Precautions
Before touching your toaster for any cleaning task, remember these critical safety rules:
- Unplug First: Always, without exception, disconnect your toaster from the power outlet. This eliminates the risk of electric shock.
- Let It Cool: Ensure the toaster has completely cooled down if it’s been recently used. Hot elements can cause burns.
- No Water Inside: Never immerse your toaster in water or allow water to get into the toasting slots, levers, or electrical components. Water and electricity are a dangerous combination.
- Avoid Metal Objects: Do not use knives, forks, or other metal utensils to scrape out crumbs from inside the toaster, as this can damage heating elements or cause a short circuit.
Tools You’ll Need
Gather these simple tools for an effective deep clean:
- Soft-Bristle Pastry Brush or Clean Paintbrush: Ideal for gently sweeping away crumbs without damaging elements.
- Microfiber Cloths or Paper Towels: For wiping down surfaces.
- Mild Dish Soap (Optional): For exterior stains.
- White Vinegar (Optional): For stubborn marks or odor removal on the exterior.
- Compressed Air Duster (Optional): Can help dislodge stubborn crumbs.
- Toothpick or Cotton Swab (Optional): For crevices.
 Essential tools for safe toaster cleaning, including brush, cloth, and dish soap.
Step-by-Step Guide to Safe Deep Cleaning
Follow these steps for a toaster that’s clean and safe:
-
Unplug and Cool: As emphasized, this is the first and most critical step. Ensure the toaster is completely disconnected from power and cold to the touch.
-
Empty and Clean the Crumb Tray:
- Locate the removable crumb tray, usually found at the bottom of your toaster. Slide it out gently. Some 4-slice models may have two.
- Discard all accumulated crumbs into the trash.
- Wash the crumb tray with warm, soapy water. For stubborn baked-on grime, a paste of baking soda and a little water can work wonders.
- Rinse thoroughly and ensure the tray is completely dry before reinserting it. Moisture can cause rust or electrical issues.
-
Gentle Interior Brushing:
- Using your soft-bristle pastry brush or paintbrush, gently sweep crumbs from the heating elements towards the bottom opening where the crumb tray normally sits. Be extremely careful not to touch or damage the fragile heating elements. The goal is to loosen crumbs so they can fall out.
-
Inverting and Shaking:
- Over a trash can or sink, carefully turn your toaster upside down. Gently shake it to dislodge any remaining loose crumbs and debris. A few gentle taps on the bottom or sides can help. Repeat the brushing and shaking until no more crumbs fall out.
-
Exterior Cleaning:
- Dampen a microfiber cloth with warm water. For more stubborn stains, add a small drop of mild dish soap to the cloth, or use a solution of half water, half white vinegar.
- Wipe down the entire exterior of the toaster. For stainless steel finishes, you might follow up with a specialized stainless steel cleaner.
- Use a dry cloth to buff the exterior and remove any moisture or streaks.
- For crevices around the lever or buttons, a toothpick or cotton swab can be used to meticulously remove grime.
-
Drying and Reassembly:
- Ensure all parts are completely dry, especially the crumb tray, before sliding it back into place.
- Your toaster is now deeply cleaned and ready for safe use.
The Nuance of Toaster Disassembly: What It Really Means
While the query might suggest disassembling for cleaning, it’s vital to understand the profound difference between a deep clean and a full breakdown. From a technician’s viewpoint, “disassembly” means accessing the inner workings, not simply clearing crumbs.
When Disassembly Might Occur
Full disassembly is almost exclusively reserved for:
- Repairs: Diagnosing and fixing internal electrical faults, replacing faulty components like heating elements, timers, or the lowering mechanism.
- Component Replacement: Swapping out broken parts.
- Recycling/Scrapping: Separating materials for proper disposal.
It is generally not done for cleaning because the internal mess (mostly crumbs) can be managed with the methods described above, and wet cleaning agents are highly dangerous inside.
What Disassembly Involves (Briefly)
If a toaster were to be disassembled by a professional, it would involve:
- Removing External Screws: Often located on the bottom or sides, sometimes hidden under rubber feet or labels.
- Prying Open Casing: Plastic or metal casings are often clipped together in addition to screws, requiring specific tools to separate without damage.
- Navigating Internal Components: Once open, one would encounter delicate heating elements (nichrome wire or mica boards), complex wiring, circuit boards, spring mechanisms, and the electromagnet that holds the toast down. These are not designed for easy user access.
Risks Associated with Disassembly
For the average home user, the risks of attempting to disassemble a toaster are significant:
- Electric Shock: Even unplugged, capacitors in some appliances can retain a charge, posing a risk. Exposed wiring is always dangerous.
- Damaging Components: Heating elements are extremely fragile. Wires can be easily crimped, cut, or disconnected. Spring mechanisms can be difficult to reassemble correctly.
- Difficulty Reassembling: Getting all the parts back in their correct positions and ensuring all connections are secure is challenging, often leading to a non-functional appliance.
- Voiding Warranty: Any attempt to open the casing will almost certainly void the manufacturer’s warranty.
“In my ten years of hands-on experience, I’ve seen countless toasters arrive in my workshop damaged not by normal wear, but by well-intentioned owners attempting repairs or deep cleans beyond their scope. When it comes to the internals, safety and expertise are non-negotiable.” – Admin, ToasterFood.com, Toaster Repair Specialist
The ToasterFood.com Stance
At ToasterFood.com, our professional advice is clear: Do not disassemble your toaster for cleaning purposes. The risks far outweigh any potential benefits. For internal issues or deep cleaning that goes beyond what brushes and shaking can achieve, it’s best to consider if the appliance has reached the end of its practical life or, if it’s a valuable model, seek professional repair.
Different Toaster Types and Their Cleaning Considerations
The type of toaster you own influences its cleaning needs and accessibility.
Pop-up Toasters
These are the most common household toasters, featuring vertical slots where bread descends. Our deep cleaning guide (without disassembly) is primarily tailored for these models. Their crumb trays are usually easily accessible, and brushing is effective for internal crumbs. Their compact design, however, makes full internal access difficult and risky.
Toaster Ovens
Unlike pop-up toasters, toaster ovens often have a larger, more accessible interior, resembling a small oven. They typically come with removable trays, racks, and sometimes even crumb trays that slide out, making internal cleaning much easier. You can usually wipe down the interior walls and glass door with a damp cloth (once cooled and unplugged) and a mild cleaner. While easier to clean internally, the heating elements in a toaster oven still require careful handling to avoid damage. Full disassembly is still not recommended for cleaning.
Conveyor Toasters
Predominantly found in commercial settings like restaurants and hotels, conveyor toasters are designed for high-volume output. These machines are robust and have components like conveyor belts and heating elements that are often more accessible for heavy-duty cleaning and maintenance by trained staff. For home users, owning a conveyor toaster is rare, and their cleaning procedures fall under commercial equipment maintenance protocols, far beyond home disassembly.
Key Features That Aid Cleaning
When selecting a new toaster, consider features that make maintenance easier and reduce the need for drastic cleaning measures:
- Easily Removable Crumb Tray: A tray that slides out smoothly and is dishwasher-safe simplifies crumb disposal. Some 4-slice models offer two trays for greater efficiency.
- Non-Stick Interior Coatings: Found mostly in toaster ovens, these surfaces make wiping away spills and baked-on food much easier.
- Smooth Exterior Surfaces: Toasters with stainless steel or smooth plastic exteriors are easier to wipe clean than those with textured or intricate designs where grime can hide.
Tips for Toaster Longevity and Preventing Deep Disassembly Needs
Proactive maintenance can prevent the buildup that might make you consider risky disassembly:
- Regular Crumb Tray Emptying: Make it a habit to empty the crumb tray after every few uses. This is the single most effective way to prevent accumulated debris.
- Avoid Sticky Foods: Toasting items with cheese, jams, or glazes directly in a pop-up toaster will inevitably lead to burnt-on residue and is strongly discouraged. Use a toaster oven for such items.
- Shake Gently After Each Use: A quick, gentle inversion over a trash can after unplugging can help dislodge fresh crumbs before they settle.
- Proper Storage: Keep your toaster in a clean, dry area away from excessive dust or kitchen grease that can coat the exterior.
Conclusion
A clean toaster isn’t just about aesthetics; it’s about food safety, fire prevention, and ensuring your appliance performs at its best for years to come. While the idea of disassembling your toaster for a thorough clean might seem logical, my extensive experience as a toaster technician teaches that it’s rarely necessary or safe for the average home user. Focus on consistent basic cleaning and diligent deep cleaning without disassembly, employing the methods and safety precautions outlined above. For issues requiring internal access, it’s always wisest to consult a professional technician. Embrace these safe and effective cleaning practices, and your toaster will continue to be a cherished part of your kitchen, delivering perfectly toasted delights every time.
What are your biggest challenges when it comes to keeping your toaster clean?
Frequently Asked Questions
Why shouldn’t I disassemble my toaster for deep cleaning?
Disassembling a toaster is risky due to exposed electrical components, fragile heating elements, and complex mechanical parts that are difficult to reassemble correctly. It can lead to electric shock, permanent damage to the appliance, and typically voids the manufacturer’s warranty. For thorough cleaning, effective methods exist that don’t require taking the toaster apart.
Can I use water or cleaning sprays inside my toaster?
Absolutely not. Water and cleaning sprays can damage electrical components, create rust, and pose a severe risk of electric shock or short circuits. All internal cleaning should be done using dry methods like brushing and shaking, after the toaster is unplugged and cooled.
How often should I deep clean my toaster?
The frequency depends on usage. For daily users, a deep clean (without disassembly) is recommended once a month. For occasional users, once every two to three months should suffice. Always empty the crumb tray more frequently, ideally after every few uses.
What causes a “burnt smell” when using my toaster?
A burnt smell usually indicates accumulated crumbs or food debris inside the toaster that are heating up and burning. This is a common issue and a strong signal that your toaster is due for a thorough deep clean, focusing on removing all crumbs from the crumb tray and interior using brushes.
Is it safe to use compressed air to clean inside my toaster?
Yes, compressed air can be a useful tool for dislodging stubborn crumbs from hard-to-reach areas within your toaster. Ensure the toaster is unplugged and cooled, and use short bursts of air, always directing the debris towards the crumb tray opening or into a trash can. Avoid using it near any liquid or while the toaster is powered on.