There’s nothing quite like the promise of perfectly golden, crisp toast to start your day. Yet, too often, this simple pleasure turns into a morning frustration: one side of your bread emerges beautifully browned while the other remains pale and underdone. This common toaster conundrum can leave you scratching your head, wondering if your appliance is rebelling. If your toaster has developed a habit of only toasting one side, don’t rush to replace it just yet. This guide will delve into the underlying causes of this uneven browning and provide actionable steps to get your toaster back to delivering consistent, delicious results.
Understanding Your Toaster’s Inner Workings
Before we tackle the fixes, it helps to understand the basics of how a pop-up toaster operates. At its core, a toaster relies on heating elements, typically made of Nichrome wire, which glow red when electricity passes through them. These elements radiate heat to toast your bread. Most toasters have multiple elements, usually one on each side of every slot. When one of these elements isn’t performing as it should, the result is inevitably uneven toasting.
Common Reasons Your Toaster Toasts Unevenly
Several factors can contribute to your toaster favoring one side of your bread. Identifying the specific cause is the first step toward a solution.
Failing Heating Elements
|
Our Picks for the Best Toaster in 2026
As an Amazon Associate I earn from qualifying purchases.
|
||
| Num | Product | Action |
|---|---|---|
| 1 | bella 2 Slice Slim Toaster, Fits-anywhere™ Kitchenware, 6 Setting Shade Control with Reheat & Cancel Buttons, Fits Sourdough, 10” Long Slot, Anti Jam & Auto Shutoff, 900 Watt, Seaglass |

|
| 2 | bella 2 Slice Slim Toaster, Fits-anywhere™ Kitchenware, 6 Setting Shade Control with Reheat & Cancel Buttons, Fits sourdough, 10” Long Slot, Anti Jam & Auto Shutoff, 900 Watt, Plum |
|
| 3 | bella 2 Slice Slim Toaster, Fits-anywhere™ Kitchenware, 6 Setting Shade Control with Reheat & Cancel Buttons, Fits sourdough, 10” Long Slot, Anti Jam & Auto Shutoff, 900 Watt, Blossom |
|
| 4 | Elite Gourmet ECT1027B Cool Touch Toaster with 6 Temperature Settings & Extra Wide 1.25" Slots for Bagels, Waffles, Specialty Breads, Puff Pastry, Snacks, ETL Certified, 2 Slices, Black |
|
| 5 | bella 2 Slice Slim Toaster, Fits-anywhere™ Kitchenware, 6 Setting Shade Control with Reheat & Cancel Buttons, Fits Sourdough, 10” Long Slot, Anti Jam & Auto Shutoff, 900 Watt, Surf |
|
| 6 | bella 2 Slice Slim Toaster, Fits-anywhere™ Kitchenware, 6 Setting Shade Control with Reheat & Cancel Buttons, Fits sourdough, 10” Long Slot, Anti Jam & Auto Shutoff, 900 Watt, Oatmilk |
|
| 7 | Touch Screen Toaster - 4 Slice, 2 Extra Long Slots - 5 Bread Types and 6 Browning Levels - Defrost, Reheat, Favorite, & Single Slot Modes - For Toast, Bagels, & Waffles – White |
|
| 8 | Amazon Basics 2 Slice Toaster, With 6 Browning Settings, Extra Wide Slots For Bagels and Special Breads, Removable Easy-to-Clean Crumb Tray, Cancel/Defrost/Bagel Buttons, 900W, Black & Silver |
|
| 9 | KEYWIND VTG RIC DELUXE LONG SE |
|
| 10 | STRING SET BASS STD 45w 55w 75w 105w |
|
One of the most frequent culprits behind uneven toasting is a compromised heating element. Over time, these elements can wear out, become damaged, or even break. If you observe that one side of your toaster’s slot glows brightly while the opposite side remains dull or dark, it’s a strong indicator that the heating element on the under-toasted side is faulty. When a heating coil loses its integrity or completely stops functioning, it simply cannot generate enough heat for uniform browning.
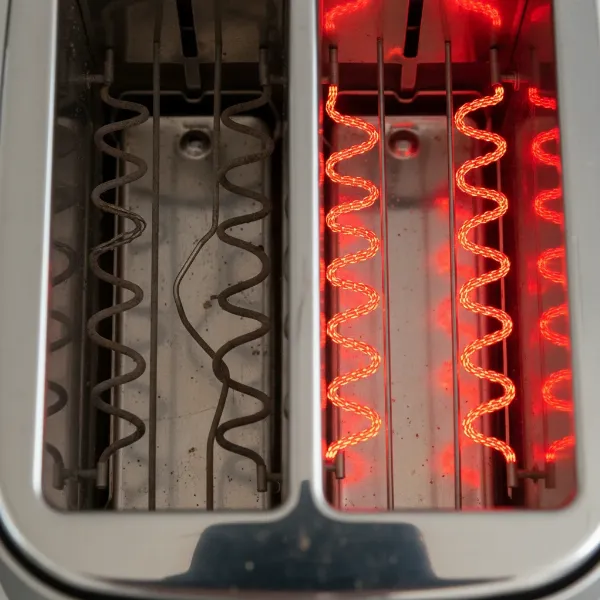 A close-up of a toaster slot showing one heating element not glowing, indicating a fault.
Accumulated Crumbs and Debris
Bread crumbs, burnt bits, and other food particles are notorious for accumulating inside your toaster. These tiny culprits can block the radiant heat from reaching your bread evenly, creating cold spots that result in pale toast. Beyond affecting performance, a significant buildup of crumbs can become a fire hazard, as they are combustible when exposed to the toaster’s heat. Regular cleaning is crucial to prevent this issue.
Uneven Bread Placement or Bread Type
Sometimes, the problem isn’t with the toaster itself but with how the bread is placed or the type of bread being toasted. If a slice of bread isn’t sitting squarely in the center of the slot and leans against one heating element, that side will naturally brown faster and darker. Additionally, different types of bread—thicker slices, denser loaves, or bread with higher moisture content—can toast unevenly, requiring adjustments to the toasting time or settings.
Thermostat or Internal Wiring Malfunctions
Your toaster’s thermostat and internal wiring are critical for controlling the toasting cycle and ensuring consistent heat. A weak or damaged thermostat can lead to inconsistent heat distribution, causing one side to toast prematurely or not at all. Similarly, loose wires, burnt connectors, or faulty timing circuits within the toaster can disrupt the electrical flow to specific heating elements, resulting in uneven browning. These issues often manifest as one slot finishing much earlier or later than others, or the toast color changing with every cycle.
Faulty Solenoid or Lever Mechanism
While less directly related to uneven heat, a malfunctioning solenoid or lever mechanism can sometimes indirectly contribute to uneven toasting. If the carriage doesn’t latch properly or releases too early, it can interrupt the full heating cycle, potentially leaving one side less toasted if the heat distribution was already marginally imbalanced. A faulty solenoid can also prevent the toast from popping up correctly.
Power Supply Issues
Though less common for only one side of a toaster to be affected, general power supply issues can impact overall performance. A loose connection in the power cable or problems with your electrical outlet could potentially lead to insufficient or intermittent power delivery, which might manifest in uneven heating. However, this usually affects the entire appliance rather than just one side.
Step-by-Step Troubleshooting Guide
Before attempting any fixes, remember: safety first! Always unplug your toaster from the power outlet and allow it to cool completely before inspecting or cleaning it.
Safety First: Unplugging Your Toaster
This is the most critical step. Ensure the toaster is completely disconnected from its power source. Do not proceed with any inspection or cleaning until you are certain it is unplugged and cool to the touch.
The Crumb Tray and Deep Clean
- Empty the Crumb Tray: Turn your toaster upside down over a trash can and pull out the crumb tray. Shake it gently to dislodge all loose crumbs.
- Internal Cleaning: With the crumb tray removed, use a flashlight to look inside the toaster slots. If you see black carbon deposits or stubborn crumbs stuck to the heating elements or internal walls, gently dislodge them. Use a soft brush (like a pastry brush or a dedicated toaster brush) or a wooden stick. Never use metal tools as they can damage the delicate heating wires or pose an electrical shock hazard. Cleaning alone often resolves 40-50% of uneven toasting issues.
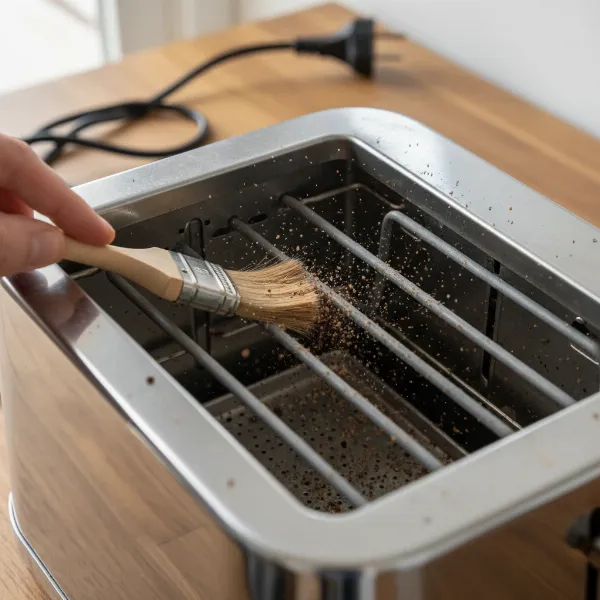 Hand using a soft brush to remove accumulated crumbs and debris from inside a toaster slot.
Visual Inspection of Heating Elements
After cleaning, plug your toaster back in briefly and observe the heating elements.
- Activate Toaster: Lower the lever to start a toasting cycle (without bread).
- Observe Glow: Watch for the elements to heat up and glow. Are all elements glowing a consistent bright red? If one side’s elements remain dull, dark, or show visible breaks, that’s your problem area.
- Safety Note: Do this only for a few seconds to observe the glow, then unplug immediately. Do not leave it running unattended.
Checking Bread Placement and Adjusting Settings
- Center Your Bread: Always ensure that your slice of bread is placed as centrally as possible within the toaster slot. Avoid forcing oversized slices.
- Rotate for Evenness: If your toaster consistently browns one side more, try toasting the bread for half the desired time, then rotating it 180 degrees in the slot for the remainder of the cycle.
- Adjust for Bread Type: Thicker or moister bread may require a longer toasting time or a lower setting to achieve even browning without burning one side.
Advanced Checks (Internal Components – When to Call a Pro)
If cleaning and adjusting bread placement don’t solve the problem, the issue might be with internal components.
- Examine Wires and Contacts: If you are comfortable and knowledgeable about appliance repair, you can carefully open the bottom panel (after ensuring the toaster is unplugged) to look for loose wires, burnt connectors, weak springs, or dirty contacts, especially around the thermostat or timing circuit. Tightening loose terminals or cleaning contacts might help.
- Fuses and Coils: Toasters contain fuses and sometimes induction coils. If a fuse has cut power to a heating element, it will need replacement. Testing these components usually requires a multimeter and a good understanding of electronics.
- Professional Help: For any issues involving electrical connections, internal wiring, or component replacement (like heating elements, thermostats, or control boards), it’s highly recommended to contact a qualified appliance repair technician. Attempting complex electrical repairs without expertise can be dangerous.
When to Consider Professional Repair or Replacement
Deciding whether to repair or replace your toaster often comes down to two main factors: safety and cost-effectiveness.
Safety Concerns
Any issue involving exposed or frayed wiring, persistent burning smells, sparking, or overheating should be immediately addressed by a professional. Electrical malfunctions pose significant safety risks, including fire and electric shock. Never compromise safety for a piece of toast.
Cost-Effectiveness
Many modern toasters, especially entry-level models, are designed to be economically built, making them often considered “throw-away” appliances. If the cost of professional repair approaches or exceeds the price of a new, reliable toaster, replacement is often the more practical and economical choice. However, for higher-end or specialty toasters, repair might be a worthwhile investment.
Maintenance Tips for Even Toasting
Preventative maintenance can significantly extend your toaster’s lifespan and ensure consistent performance.
Regular Cleaning
Make it a habit to clean your toaster’s crumb tray at least once a week if you use it daily. Unplug, empty the tray, and give it a gentle shake to clear any stubborn debris. A clean toaster is a happy toaster, and a safer one too.
Proper Use
Avoid forcing oversized items into the slots. Only toast items intended for a toaster. Overloading or using the toaster back-to-back without allowing it to cool can put undue stress on its components.
Invest in Quality
While a budget toaster might seem appealing, investing in a high-quality model from a reputable brand can often lead to greater durability and more consistent toasting performance in the long run. Look for features like wider slots, more robust elements, and reliable temperature controls.
Conclusion
Uneven toasting can be a frustrating daily occurrence, but it’s often a fixable problem stemming from simple issues like crumb buildup or failing elements. By systematically troubleshooting and performing regular maintenance, you can often restore your toaster to its former glory, ensuring every slice emerges uniformly golden and delicious. Remember to prioritize safety above all else, and don’t hesitate to seek professional help or consider a replacement if internal electrical issues are suspected. Here’s to many more mornings of perfect toast!
Frequently Asked Questions
Why do some toasters naturally toast one side more than the other?
Some toaster designs, particularly older or cheaper models, might have elements that are positioned closer to one side of the bread or have a slightly uneven heat distribution where internal elements run hotter. This can lead to one side consistently browning more than the other due to inherent design limitations rather than a malfunction.
How often should I clean my toaster?
If you use your toaster daily, you should aim to empty and clean the crumb tray at least once a week. For less frequent use, cleaning every two to four weeks should suffice. Regular cleaning prevents crumb buildup, which can cause uneven toasting and pose a fire hazard.
Is it safe to try and fix my toaster myself?
Basic troubleshooting steps like cleaning the crumb tray and dislodging visible crumbs are generally safe after unplugging the appliance. However, for any repairs involving internal electrical components, wiring, or heating elements, it’s best to consult a qualified technician due to the risk of electric shock or further damage if not handled correctly.
Can old bread affect how my toaster performs?
While old bread itself doesn’t typically affect the toaster’s performance, stale or dried-out bread might toast faster and more intensely than fresh bread. This can make uneven toasting more noticeable, as the drier areas will react more quickly to the heat. Adjusting your toaster settings for different bread conditions can help.