Few kitchen mishaps are as frustrating as discovering melted cheese or plastic marring your beloved toaster. It’s a common issue, often the result of a stray bread bag too close to a hot surface or an ambitious grilled cheese attempt gone awry. Beyond the unsightly mess, melted substances can pose fire hazards, emit unpleasant odors, and impact your toaster’s performance and lifespan. As a seasoned technician with over a decade in the world of toasters, I’ve seen it all, and I’m here to guide you through safely and effectively restoring your appliance to its pristine, toast-making glory.
Understanding the Challenge: Melted Cheese vs. Melted Plastic
While both melted cheese and plastic present a cleaning dilemma, their chemical compositions and behaviors when heated demand different approaches. Understanding these differences is the first step toward a successful cleanup.
Why It Happens
|
Our Picks for the Best Toaster in 2026
As an Amazon Associate I earn from qualifying purchases.
|
||
| Num | Product | Action |
|---|---|---|
| 1 | KEYWIND VTG RIC DELUXE LONG SE |

|
| 2 | bella 2 Slice Slim Toaster, Fits-anywhere™ Kitchenware, 6 Setting Shade Control with Reheat & Cancel Buttons, Fits Sourdough, 10” Long Slot, Anti Jam & Auto Shutoff, 900 Watt, Seaglass |
|
| 3 | bella 2 Slice Slim Toaster, Fits-anywhere™ Kitchenware, 6 Setting Shade Control with Reheat & Cancel Buttons, Fits sourdough, 10” Long Slot, Anti Jam & Auto Shutoff, 900 Watt, Oatmilk |
|
| 4 | bella 2 Slice Slim Toaster, Fits-anywhere™ Kitchenware, 6 Setting Shade Control with Reheat & Cancel Buttons, Fits sourdough, 10” Long Slot, Anti Jam & Auto Shutoff, 900 Watt, Blossom |
|
| 5 | Elite Gourmet ECT1027B Cool Touch Toaster with 6 Temperature Settings & Extra Wide 1.25" Slots for Bagels, Waffles, Specialty Breads, Puff Pastry, Snacks, ETL Certified, 2 Slices, Black |
|
| 6 | bella 2 Slice Slim Toaster, Fits-anywhere™ Kitchenware, 6 Setting Shade Control with Reheat & Cancel Buttons, Fits Sourdough, 10” Long Slot, Anti Jam & Auto Shutoff, 900 Watt, Surf |
|
| 7 | Touch Screen Toaster - 4 Slice, 2 Extra Long Slots - 5 Bread Types and 6 Browning Levels - Defrost, Reheat, Favorite, & Single Slot Modes - For Toast, Bagels, & Waffles – White |
|
| 8 | bella 2 Slice Slim Toaster, Fits-anywhere™ Kitchenware, 6 Setting Shade Control with Reheat & Cancel Buttons, Fits sourdough, 10” Long Slot, Anti Jam & Auto Shutoff, 900 Watt, Plum |
|
| 9 | Amazon Basics 2 Slice Toaster, With 6 Browning Settings, Extra Wide Slots For Bagels and Special Breads, Removable Easy-to-Clean Crumb Tray, Cancel/Defrost/Bagel Buttons, 900W, Black & Silver |
|
| 10 | STRING SET BASS STD 45w 55w 75w 105w |
|
Accidents happen in the kitchen. A plastic bread wrapper might inadvertently lean against the warm exterior of a toaster, or an overfilled cheese sandwich could drip its delicious contents into the heating elements. The high temperatures required for perfect toast are more than enough to soften and melt these materials, creating a stubborn, often smoky, residue.
Safety First: Essential Precautions
Before you begin any cleaning endeavor, remember that safety is paramount. Ignoring these precautions can lead to electric shock, burns, or further damage to your appliance.
- Always Unplug: This is non-negotiable. Disconnect the toaster from its power source completely.
- Allow to Cool Completely: Resist the urge to clean while hot. Melted substances can be extremely sticky and cause severe burns. Wait until the toaster is entirely cool to the touch.
- Never Use Abrasive Materials on Heating Elements: Steel wool or harsh scrapers can damage the delicate heating coils, compromising your toaster’s function and potentially creating a safety hazard.
- Ensure Ventilation: Especially when dealing with melted plastic, fumes can be toxic. Work in a well-ventilated area, perhaps near an open window or with a fan running.
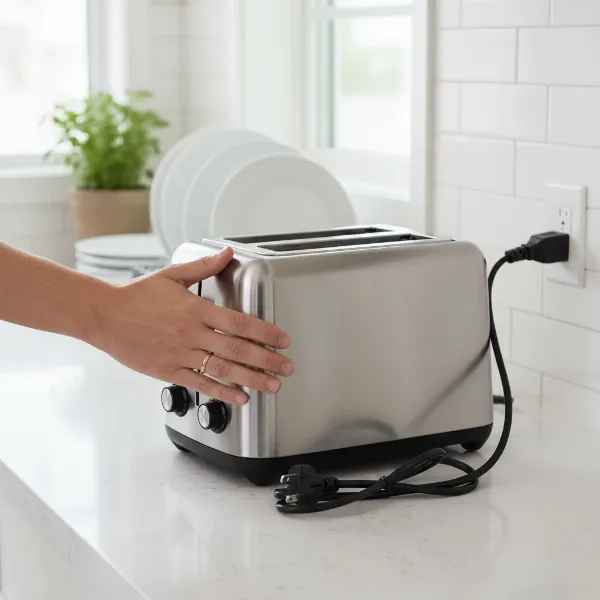 An unplugged toaster cooling on a counter, emphasizing safety before cleaning melted substances.
Conquering Melted Cheese: A Step-by-Step Guide
Melted cheese, while delicious on toast, can be a gooey nightmare inside the toaster. The good news is that with the right technique, it’s often more manageable than plastic.
For Cheese Spills on Crumb Tray or Exterior
If the cheese has only melted onto the removable crumb tray or the toaster’s cool exterior casing, consider yourself lucky!
- Cool and Unplug: As always, ensure the toaster is unplugged and fully cooled.
- Remove Crumb Tray: Slide out the crumb tray and scrape off any hardened cheese with a plastic spatula or a wooden tool. For stubborn bits, soak the tray in warm, soapy water for 10-15 minutes, then scrub clean.
- Clean Exterior: For external drips, gently scrape off the hardened cheese. Then, wipe the area with a damp cloth and a drop of mild dish soap. Rinse the cloth and wipe again to remove soap residue.
For Cheese Melted Inside the Toaster (on Elements or Sides)
This scenario requires a bit more care, as you’re working near sensitive components.
- Cool and Unplug: Confirm the toaster is unplugged and completely cool.
- Turn Upside Down and Shake: Gently invert the toaster over a trash can and shake out any loose, hardened cheese bits.
- Gentle Scraping: Using a non-metallic tool like a wooden skewer, a silicone spatula, or a plastic butter knife, very carefully chip away at the hardened cheese. Avoid forcing it or pressing against the heating elements.
- Slightly Warm to Soften (Use Extreme Caution): For extremely stubborn, hardened cheese that won’t budge, you can briefly plug in the toaster and turn it on for just 10-15 seconds. The goal is to slightly soften the cheese, not melt it further or burn it. Immediately unplug the toaster and, once it’s safe to touch, attempt to scrape again with your non-metallic tool. Be aware that this can cause a burning smell.
- Consider Professional Help or Replacement: If the cheese is extensively melted onto or into the heating coils, it might be safer to consult a repair professional. In severe cases where the elements are caked or damaged, purchasing a new toaster might be the most practical and safest solution.
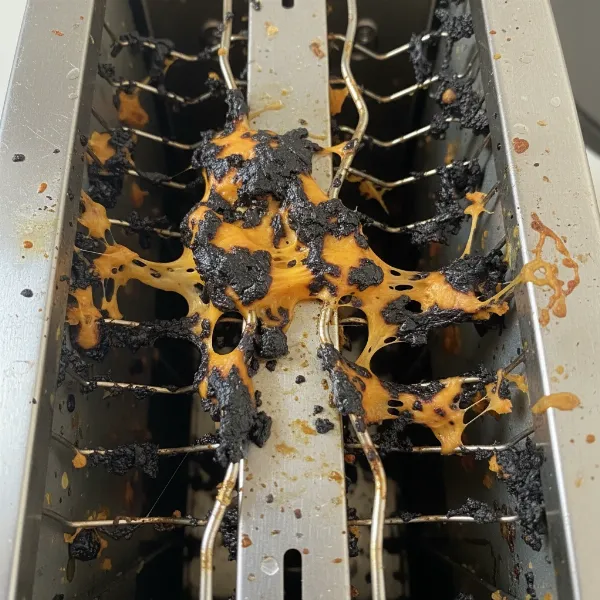 Close-up of toaster heating elements with stubborn, melted cheese or plastic residue, illustrating a challenging cleaning situation.
Tackling Melted Plastic: Specialized Solutions
Melted plastic is often trickier than cheese, as it can bond strongly to metal and release unpleasant fumes when heated. The approach depends heavily on whether the plastic is on the exterior or interior.
For Plastic on the Exterior (Metal Casing)
If a plastic bread bag has melted onto the cool, metal exterior of your toaster, these methods can help. Remember to always test a small, inconspicuous area first.
- Method 1: Acetone-based Nail Polish Remover: Acetone is a powerful solvent. Apply a small amount to a soft cloth or cotton ball and gently rub the affected area. Be extremely careful not to let acetone touch any plastic parts of the toaster, as it will dissolve them. This method is best for metal exteriors.
- Method 2: Petroleum Jelly (Vaseline): Apply a generous layer of petroleum jelly over the melted plastic. Let it sit for several hours, or even overnight. The petroleum jelly helps to soften and loosen the plastic’s grip on the metal, allowing you to scrape it off gently with a plastic scraper or old credit card. Wipe clean with a damp cloth.
- Method 3: Goo Gone or Similar Adhesive Remover: Products like Goo Gone are formulated to break down sticky residues. Apply as directed on the product label, typically by dabbing it onto the plastic and allowing it to penetrate for a few minutes before gently scraping or wiping away. Again, avoid contact with any non-metal plastic parts of the toaster.
- Method 4: Dishwasher Detergent Paste: Create a paste by mixing a small amount of powdered dishwasher detergent with water. Apply this paste over the melted plastic, cover it with a damp paper towel or cloth, and leave it overnight. The chemicals in the detergent can help break down the plastic, making it easier to scrub off the next morning.
- Method 5: Ammonia: For tough plastic residue, soak a rag with ammonia and place it over the melted plastic. Allow it to sit for a few minutes to soften the plastic, then gently scrape it off. Ensure good ventilation when using ammonia.
For Plastic on Interior Heating Elements
This is the most challenging scenario and often comes with significant risks.
- Important Note on Fumes: Heating plastic can release toxic fumes. If plastic has melted onto the interior heating elements, there’s a real risk of these fumes being released every time you use the toaster.
- Gentle Warming (with Extreme Caution): This method should be considered a last resort and performed with maximum care. In a well-ventilated area, you might briefly plug in the toaster and turn it on for a very short duration (5-10 seconds) to just soften the plastic. Immediately unplug the toaster. Once it has cooled just enough to be handled safely (but still warm), try to gently peel or scrape the softened plastic off with a wooden or silicone tool. Never allow the plastic to get hot enough to smoke or melt further.
- When to Replace: If the plastic is deeply fused onto or covers significant portions of the heating elements, the safest and most recommended course of action is often to replace the toaster. The risk of toxic fumes and potential impairment of the toaster’s function outweighs the cost of a new appliance. Your health and safety are paramount.
Post-Cleaning Care and Prevention
Once you’ve successfully removed the offending substances, a few final steps can ensure your toaster is ready for safe use and help prevent future incidents.
Odor Removal
After cleaning, especially if plastic was involved, there might be residual odors.
- Run Empty: In a well-ventilated area (e.g., near an open window or under an extractor fan), run the toaster empty on a medium setting a few times. This helps to burn off any lingering residue and dissipate odors.
- Baking Soda (Exterior Only): For exterior odors, wipe down the toaster with a damp cloth lightly dusted with baking soda, then wipe clean with a fresh damp cloth. Do not apply baking soda directly to heating elements.
Preventative Measures
An ounce of prevention is worth a pound of cure.
- Use Toaster Bags: For grilled cheese, paninis, or anything with potential drips, toaster bags are a game-changer. They prevent food from touching the heating elements, simplifying cleanup immensely.
- Keep Plastic Away: Be mindful of where you store bread bags, plastic wraps, and other plastic items. Always keep them a safe distance from a hot or recently used toaster.
- Regular Crumb Tray Emptying: Make it a habit to empty the crumb tray frequently. This prevents crumb buildup and makes it easier to spot and address any small spills before they become major problems.
- Proper Storage: Store your toaster in a clear, uncluttered space on your countertop, away from anything that could accidentally fall into or onto it.
Conclusion
Dealing with melted cheese or plastic in your toaster can seem daunting, but with a methodical approach and adherence to safety guidelines, you can effectively resolve most situations. Whether you’re carefully scraping off hardened cheese or cautiously dissolving stubborn plastic, the key is patience, the right tools, and an unwavering commitment to safety. Maintaining a clean toaster not only extends its life and ensures delicious, uncontaminated toast, but also prevents potential hazards in your kitchen. Which of these methods have you found most effective in your own kitchen?
Frequently Asked Questions
Is it safe to use a toaster after plastic melts in it?
It depends on the severity and location of the melted plastic. If a small amount is on the exterior and fully removed without residue, it may be safe. However, if plastic has melted onto or into the heating elements, it’s generally not safe to use due to the risk of toxic fumes being released and potential damage to the toaster’s function.
Can I use steel wool or abrasive scrubbers to clean my toaster?
No, absolutely not. Steel wool or other abrasive scrubbers can scratch the toaster’s finish and, more importantly, can damage the delicate heating elements. This can create unsafe conditions and shorten the life of your appliance. Always opt for soft cloths, sponges, or non-metallic scraping tools.
How often should I clean my toaster?
The crumb tray should be emptied after every few uses or at least once a week to prevent buildup. A deeper clean of the interior and exterior surfaces should be performed once a month or as needed, especially after any spills or incidents involving melted substances.