Imagine starting your day with perfectly golden toast, every single time. Your toaster, whether a sleek pop-up or a versatile toaster oven, plays a pivotal role in this morning ritual. But like any workhorse appliance, its performance hinges on one critical component: the heating elements. Over time, these vital coils can accumulate grime, impacting efficiency and even posing safety risks. Maintaining your toaster’s heating elements isn’t just about prolonging its life; it’s about ensuring every slice emerges consistently crisp and delicious.
As someone deeply immersed in the world of toasters, from intricate repairs to performance evaluations, I understand the nuances that keep these kitchen essentials running smoothly. This guide will delve into the simple yet effective strategies to care for your toaster’s heating elements, ensuring they deliver optimal warmth for years to come.
Understanding Your Toaster’s Heating Elements
At the heart of every toaster lies its heating elements, typically made from Nichrome wire—an alloy of nickel and chromium. When electricity flows through these wires, their high resistance causes them to glow red-hot, emitting the infrared radiation that toasts your bread. In pop-up toasters, these wires are usually housed within mica sheets, providing even heat distribution within confined slots. Toaster ovens, on the other hand, often feature more exposed coil elements at the top and bottom, offering greater versatility for baking and broiling.
Regardless of the design, these elements are susceptible to buildup from crumbs, grease splatters, and burnt food particles. This residue acts as an insulator, preventing the elements from heating efficiently and evenly. It can also lead to unpleasant odors, smoke, and, in severe cases, even fire hazards.
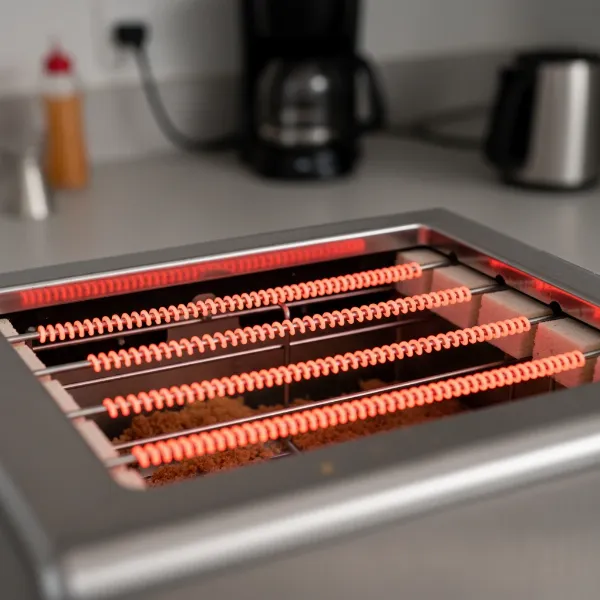 nichrome wire glowing red-hot inside a pop-up toaster slot
The Indispensable Value of Regular Maintenance
Neglecting your toaster’s heating elements has several repercussions that extend beyond just a less-than-perfect slice of toast.
First and foremost is safety. Accumulated crumbs and grease are highly flammable. When heated, these particles can ignite, turning a simple breakfast into a dangerous kitchen emergency. Regular cleaning significantly mitigates this risk.
Secondly, performance suffers. A layer of burnt residue on your heating elements can lead to uneven toasting, where one side of your bread might be perfectly browned while the other remains pale. This inefficiency also means your toaster might take longer to achieve the desired result, consuming more energy in the process.
Finally, proper maintenance directly impacts the longevity of your appliance. By preventing corrosion, overheating, and damage from excessive buildup, you extend the lifespan of your toaster, saving you the cost and hassle of premature replacement.
Step-by-Step Cleaning Guide for Toaster Heating Elements
Cleaning toaster heating elements requires a gentle, meticulous approach to avoid damage. Always prioritize safety before beginning.
Essential Safety Precautions
|
Our Picks for the Best Toaster in 2026
As an Amazon Associate I earn from qualifying purchases.
|
||
| Num | Product | Action |
|---|---|---|
| 1 | KEYWIND VTG RIC DELUXE LONG SE |

|
| 2 | bella 2 Slice Slim Toaster, Fits-anywhere™ Kitchenware, 6 Setting Shade Control with Reheat & Cancel Buttons, Fits sourdough, 10” Long Slot, Anti Jam & Auto Shutoff, 900 Watt, Plum |
|
| 3 | bella 2 Slice Slim Toaster, Fits-anywhere™ Kitchenware, 6 Setting Shade Control with Reheat & Cancel Buttons, Fits sourdough, 10” Long Slot, Anti Jam & Auto Shutoff, 900 Watt, Blossom |
|
| 4 | STRING SET BASS STD 45w 55w 75w 105w |
|
| 5 | Touch Screen Toaster - 4 Slice, 2 Extra Long Slots - 5 Bread Types and 6 Browning Levels - Defrost, Reheat, Favorite, & Single Slot Modes - For Toast, Bagels, & Waffles – White |
|
| 6 | Elite Gourmet ECT1027B Cool Touch Toaster with 6 Temperature Settings & Extra Wide 1.25" Slots for Bagels, Waffles, Specialty Breads, Puff Pastry, Snacks, ETL Certified, 2 Slices, Black |
|
| 7 | bella 2 Slice Slim Toaster, Fits-anywhere™ Kitchenware, 6 Setting Shade Control with Reheat & Cancel Buttons, Fits Sourdough, 10” Long Slot, Anti Jam & Auto Shutoff, 900 Watt, Seaglass |
|
| 8 | bella 2 Slice Slim Toaster, Fits-anywhere™ Kitchenware, 6 Setting Shade Control with Reheat & Cancel Buttons, Fits sourdough, 10” Long Slot, Anti Jam & Auto Shutoff, 900 Watt, Oatmilk |
|
| 9 | bella 2 Slice Slim Toaster, Fits-anywhere™ Kitchenware, 6 Setting Shade Control with Reheat & Cancel Buttons, Fits Sourdough, 10” Long Slot, Anti Jam & Auto Shutoff, 900 Watt, Surf |
|
| 10 | Amazon Basics 2 Slice Toaster, With 6 Browning Settings, Extra Wide Slots For Bagels and Special Breads, Removable Easy-to-Clean Crumb Tray, Cancel/Defrost/Bagel Buttons, 900W, Black & Silver |
|
Before you even think about touching your toaster’s interior, take these crucial safety steps:
- Unplug the Toaster: This is non-negotiable. Ensure the appliance is completely disconnected from the power source.
- Allow it to Cool Completely: Heating elements retain heat for some time after use. Wait until the toaster is entirely cool to the touch before proceeding.
- Gather Your Tools: You’ll need a soft-bristled brush (like an old toothbrush or a pastry brush), a soft, dry cloth, a slightly damp cloth, baking soda, and white vinegar. Avoid anything abrasive like steel wool or harsh chemical cleaners.
Removing Loose Debris
Start by addressing the most common culprit: crumbs.
- For Pop-up Toasters: Open the crumb tray at the bottom (if available) and empty it thoroughly. Then, gently invert the toaster over a sink or trash can and shake it lightly to dislodge any remaining crumbs.
- For Toaster Ovens: Remove the crumb tray, racks, and baking pan. Clean these separately in warm, soapy water. Use your soft-bristled brush to gently sweep away loose crumbs from the bottom and sides of the toaster oven interior, taking care not to touch the heating elements directly with the brush bristles.
Tackling Stuck-On Residue
For burnt-on food particles or greasy residue clinging to the heating elements, a more targeted approach is needed.
- Baking Soda Paste Method:
- Create a paste by mixing a small amount of baking soda with just enough water to form a thick consistency.
- Using a soft sponge or an old toothbrush, gently apply the paste directly to the stubborn spots on the cooled heating elements. Be extremely careful not to bend or apply excessive pressure to the delicate coils.
- Let the paste sit for about 15-20 minutes to allow the baking soda to work its magic and break down the grime.
- With a clean, damp cloth (not dripping wet), gently wipe away the paste and loosened residue.
- Vinegar Solution for Extra Freshness:
- If some stains persist or for general deodorizing, mix equal parts white vinegar and water in a spray bottle.
- Lightly mist this solution onto the affected areas (avoiding electrical connections as much as possible) after the baking soda scrub.
- Let it fizz for a few moments, then wipe clean with another soft, damp cloth.
- Ensure all surfaces are thoroughly dry before reassembling or plugging in the appliance. Any lingering moisture near electrical components can be dangerous.
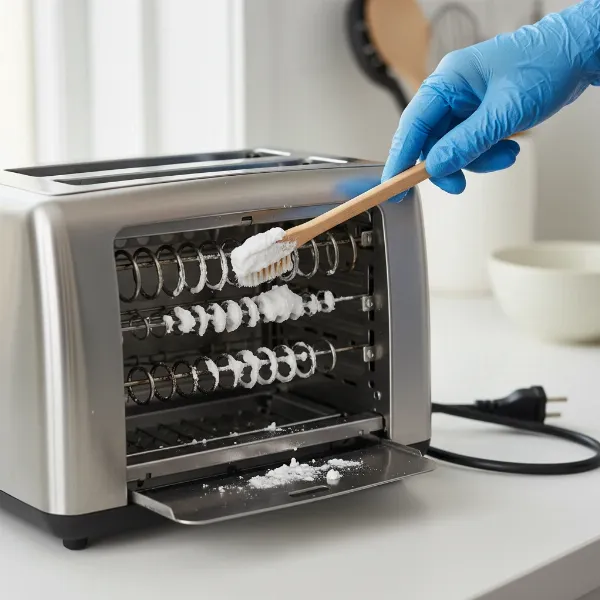 person gently applying baking soda paste to toaster heating element
What to Absolutely Avoid During Cleaning
To protect your toaster and ensure your safety, remember these strict warnings:
- NO Steel Wool or Abrasive Scrubbers: These can scratch the protective coating of the heating elements, leading to corrosion and damage.
- NO Harsh Chemical Oven Cleaners: The chemicals in these products can degrade the metal or insulation of your heating elements over time, and their fumes can be toxic when heated.
- NO Submerging in Water: Toasters are electrical appliances. Submerging them or getting excessive water inside can cause short circuits and irreparable damage.
- NO Excessive Pressure: Heating elements are fragile. Gentle wiping is key; avoid bending or forcefully scrubbing them.
Beyond Cleaning: Proactive Maintenance Tips
Maintenance goes beyond just periodic cleaning. Proactive habits can significantly extend the life and efficiency of your toaster’s heating elements.
- Prevent Future Buildup:
- Use Drip Trays (Toaster Ovens): Whenever you cook fatty foods like bacon or cheese in a toaster oven, use a drip tray underneath to catch splatters and prevent grease from reaching the elements.
- Shake Off Excess Crumbs: Before placing bread or other items in a pop-up toaster, give them a quick shake to dislodge loose crumbs.
- Regular Visual Inspection: Every few weeks, unplug your toaster and visually inspect the heating elements. Look for any signs of physical damage, excessive carbon buildup, or uneven coloration when the toaster is in use (before it fully heats up).
- Optimal Placement: Ensure your toaster has adequate space around it for ventilation. Overheating due to poor airflow can stress the heating elements.
Troubleshooting Common Heating Element Issues
Even with the best maintenance, issues can sometimes arise. Knowing what to look for can help you decide whether it’s a simple fix or time for professional help.
- Uneven Toasting: If some parts of your toast are darker than others, it could indicate uneven heating from the elements. This might be due to localized buildup that needs cleaning, or a sign of a weakening element.
- No Heat at All (but Toaster “Clicks”): If your toaster powers on and the lever stays down, but no heat is produced, the heating element is a strong suspect. This often points to a complete break in the element’s circuit.
- Smoke or Burning Smell: Persistent smoke or a burning smell, even after cleaning, suggests that there might be hidden residue, a faulty element, or an electrical issue. Discontinue use immediately.
- Frequent Tripping of Circuit Breaker: This is a serious sign of an electrical fault, potentially with the heating elements, and indicates you should stop using the appliance.
When to Consider Repair or Replacement
While some minor issues can be addressed through cleaning, there comes a point where repair or replacement of the heating element—or the entire toaster—is necessary.
- Visible Damage: If you notice cracks, blisters, frayed wires, or broken loops in the heating elements, they are compromised and should not be used.
- Persistent Performance Issues: If cleaning doesn’t resolve uneven toasting or heating problems, the elements might be worn out.
- Cost-Benefit Analysis: Replacing a heating element can be complex, especially in pop-up toasters where elements are often integrated into intricate mica sheets. For many modern, inexpensive toasters, the cost and effort of DIY repair (or professional service) might outweigh the cost of a new appliance. However, for higher-end or specialized toaster ovens, element replacement can be a cost-effective solution. DIY element replacement typically requires specialized tools (like a multimeter to test continuity) and a good understanding of electrical components. If you’re not comfortable with electrical repairs, it’s always best to consult a qualified appliance technician or consider a new unit.
“A well-maintained toaster is a testament to mindful living. It’s not just about a crispy crust, but about respecting the tools that bring comfort to our daily routines.” – Admin, ToasterFood.com
Conclusion
Your toaster is more than just an appliance; it’s a cornerstone of countless meals and memories. By dedicating a little time to its heating elements, you ensure not only its efficient and safe operation but also the continued joy of perfectly toasted bread. Regular cleaning, adherence to safety guidelines, and proactive inspection are the keys to a long-lasting and high-performing toaster.
So, are you ready to transform your toaster’s performance and embrace the art of consistent, golden perfection?
Frequently Asked Questions
How often should I clean my toaster’s heating elements?
For optimal performance and safety, it’s recommended to empty the crumb tray after every few uses. A more thorough cleaning of the heating elements themselves, especially if visible residue is present, should be done monthly or whenever you notice decreased performance or unusual odors.
Can I use oven cleaner on my toaster oven heating elements?
No, absolutely not. Oven cleaners contain harsh chemicals that can damage the delicate heating elements and their protective coatings. These chemicals can also emit toxic fumes when heated, making your toaster unsafe to use. Stick to natural cleaners like baking soda and vinegar.
Why is my toaster smoking even after I’ve cleaned it?
If your toaster still smokes after cleaning, it could indicate hidden residue that wasn’t fully removed, an internal electrical issue, or a faulty heating element. Discontinue use immediately, unplug it, and have it inspected by a professional if the smoke persists.
Is it safe to repair a broken toaster heating element myself?
Repairing a broken heating element can be complex and carries electrical risks. While some simple repairs (like tightening a loose connection) might be feasible for experienced individuals, replacing a broken element often requires specific tools and knowledge. For safety, it’s generally recommended to consult a professional or consider replacing the toaster, especially if you’re not experienced with appliance repair.
What are some signs that my toaster’s heating elements are failing?
Common signs of failing heating elements include uneven toasting, the toaster taking longer to heat up, certain sections of the elements not glowing red, or the toaster failing to heat up at all while still appearing to cycle. Visible damage like cracks or breaks in the element wire is also a clear indicator.