A frayed toaster power cord is more than just an aesthetic flaw; it’s a significant safety hazard lurking in your kitchen. That seemingly small break in the insulation can expose live wires, turning a convenient kitchen appliance into a potential source of electric shock or even a fire. As someone deeply familiar with the inner workings of toasters, I can tell you that understanding the risks and knowing when and how to address such damage is paramount. This article will guide you through identifying the dangers, discerning when a repair is feasible versus when a full replacement is necessary, and providing careful steps to safely tackle minor fraying.
Understanding Frayed Toaster Cords and Their Dangers
Why Do Toaster Cords Fray?
|
Our Picks for the Best Toaster in 2026
As an Amazon Associate I earn from qualifying purchases.
|
||
| Num | Product | Action |
|---|---|---|
| 1 | bella 2 Slice Slim Toaster, Fits-anywhere™ Kitchenware, 6 Setting Shade Control with Reheat & Cancel Buttons, Fits Sourdough, 10” Long Slot, Anti Jam & Auto Shutoff, 900 Watt, Surf |

|
| 2 | KEYWIND VTG RIC DELUXE LONG SE |
|
| 3 | bella 2 Slice Slim Toaster, Fits-anywhere™ Kitchenware, 6 Setting Shade Control with Reheat & Cancel Buttons, Fits sourdough, 10” Long Slot, Anti Jam & Auto Shutoff, 900 Watt, Oatmilk |
|
| 4 | bella 2 Slice Slim Toaster, Fits-anywhere™ Kitchenware, 6 Setting Shade Control with Reheat & Cancel Buttons, Fits Sourdough, 10” Long Slot, Anti Jam & Auto Shutoff, 900 Watt, Seaglass |
|
| 5 | Elite Gourmet ECT1027B Cool Touch Toaster with 6 Temperature Settings & Extra Wide 1.25" Slots for Bagels, Waffles, Specialty Breads, Puff Pastry, Snacks, ETL Certified, 2 Slices, Black |
|
| 6 | Amazon Basics 2 Slice Toaster, With 6 Browning Settings, Extra Wide Slots For Bagels and Special Breads, Removable Easy-to-Clean Crumb Tray, Cancel/Defrost/Bagel Buttons, 900W, Black & Silver |
|
| 7 | bella 2 Slice Slim Toaster, Fits-anywhere™ Kitchenware, 6 Setting Shade Control with Reheat & Cancel Buttons, Fits sourdough, 10” Long Slot, Anti Jam & Auto Shutoff, 900 Watt, Blossom |
|
| 8 | STRING SET BASS STD 45w 55w 75w 105w |
|
| 9 | bella 2 Slice Slim Toaster, Fits-anywhere™ Kitchenware, 6 Setting Shade Control with Reheat & Cancel Buttons, Fits sourdough, 10” Long Slot, Anti Jam & Auto Shutoff, 900 Watt, Plum |
|
| 10 | Touch Screen Toaster - 4 Slice, 2 Extra Long Slots - 5 Bread Types and 6 Browning Levels - Defrost, Reheat, Favorite, & Single Slot Modes - For Toast, Bagels, & Waffles – White |
|
Toaster cords endure a lot. They are frequently bent, twisted, and sometimes even trapped under appliances or furniture. Over time, this constant stress, combined with natural wear and tear or accidental damage from pets, can cause the outer insulation to break down. This breakdown exposes the internal wires, leading to a “frayed” appearance that signals a compromised safety barrier.
The Hidden Dangers of a Damaged Cord
The dangers of a frayed toaster cord cannot be overstated. When the protective rubber or plastic covering wears away, it leaves the live electrical wires vulnerable. This exposure creates several serious risks:
- Electric Shock and Electrocution: Touching exposed wires can result in a painful and potentially fatal electric shock. The severity depends on the voltage and current, but even a minor shock can cause injury.
- Fire Hazard: Exposed wires can lead to short circuits, where electricity flows along an unintended path, generating intense heat. This can ignite nearby flammable materials like countertops, curtains, or even the toaster itself. Arc faults, dangerous electrical discharges, also produce sparks hot enough to start fires.
- Carbon Monoxide: A smoldering electrical cord, though less common, can produce deadly carbon monoxide without visible flames, posing an invisible threat.
Many believe that simply wrapping a frayed cord with electrical tape is a sufficient fix. However, for anything beyond the most superficial nicks, tape often acts as a temporary patch that only prolongs the underlying issues, failing to adequately contain the heat or prevent further damage to the wires inside.
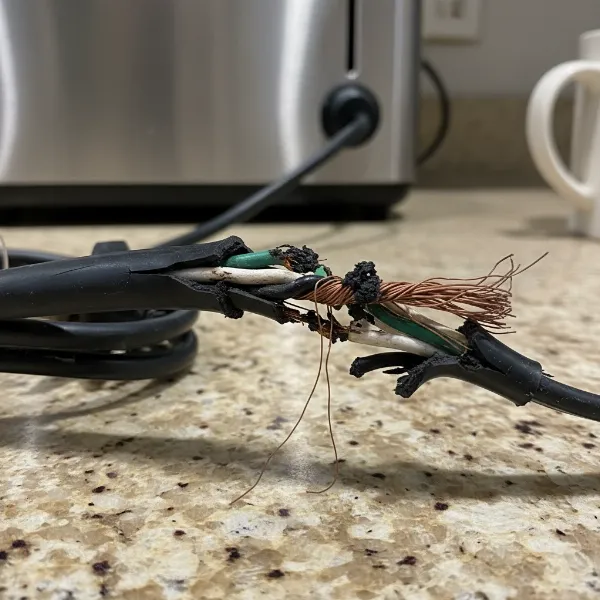 Close-up of a severely frayed toaster power cord with exposed wires
When to Repair vs. When to Replace Your Toaster Cord
Assessing the Damage: Is Repair an Option?
Deciding whether to repair or replace a frayed toaster cord depends heavily on the extent and location of the damage.
- Minor Damage: If the outer jacket has only a superficial nick or scuff, with no exposed inner wires and no signs of heat damage (like discoloration or melted plastic), a careful repair might be considered. This typically applies to very minor abrasions that haven’t compromised the insulation all the way through.
- Severe Damage: If the inner wires are exposed, cut, or severely kinked, or if the damage is close to where the cord enters the toaster or the plug, a repair is generally not recommended. These situations present a much higher risk, and the integrity of the connection is too critical to risk a DIY fix. It’s crucial to remember that toasters are high-wattage appliances. Many electrical safety experts strongly advise against repairing cords on such devices due to the inherent dangers and the potential for improper repairs to cause serious harm.
The Case for Full Replacement or Professional Help
For anything more than a hairline scratch on the outer insulation, replacing the entire power cord or, even safer, the entire toaster is often the wisest course of action. Appliance manufacturers typically design their products with specific cord types and lengths, and altering these can violate safety certifications (e.g., NRTL certification in the US).
When in doubt, always prioritize safety. If you’re uncomfortable performing a repair, lack the necessary tools or expertise, or if the damage seems significant, do not hesitate to seek help from a qualified electrician. They possess the knowledge and specialized tools to perform repairs safely or advise on the best replacement options. Sometimes, the cost and effort of properly repairing a toaster cord can outweigh the cost of simply buying a new, safe appliance.
Essential Safety Precautions and Tools Before You Begin
Before you even think about touching a frayed cord, safety must be your absolute priority. Working with electricity carries significant risks, and taking proper precautions is non-negotiable.
Prioritizing Safety: The Golden Rules
- ALWAYS Unplug the Toaster: This is the most critical step. Ensure the toaster is completely disconnected from the power outlet before you begin any inspection or repair work. Verify there is no power by trying to operate the toaster (which it shouldn’t, since it’s unplugged).
- Work in a Dry Environment: Never attempt electrical repairs in damp or wet conditions. Water conducts electricity and significantly increases the risk of shock.
- Personal Protective Equipment (PPE): Wear safety glasses to protect your eyes from stray wire strands and insulated gloves to add an extra layer of protection against accidental contact with live wires, especially if you’re uncertain about the power status.
- Understand Your Limits: If you are unsure about any step or feel uncomfortable with the process, stop immediately and seek professional assistance. Electrical work is not an area for guesswork.
Tools You’ll Need
Having the right tools makes the job safer and more effective.
- Wire Cutters/Strippers: Essential for cleanly cutting and stripping the insulation from wires.
- High-Quality Electrical Tape (UL-listed): For minor superficial repairs where no wires are exposed. Ensure it’s rated for electrical use.
- Heat-Shrink Tubing and Heat Gun: A more robust and often preferred solution for reinforcing minor damage compared to tape, especially if there’s any slight wire exposure that needs sealing. The heat gun applies controlled heat to shrink the tubing.
- Wire Nuts or Butt Connectors (and Crimping Tool): If you are undertaking a full cord replacement and making secure wire connections (though this often requires opening the toaster and is best left to professionals).
- Multimeter (Optional but Recommended): For experienced individuals, a multimeter can be used to test for continuity and ensure no shorts after a repair.
- New Replacement Cord: If you’re replacing the entire cord, ensure it is of the correct gauge and type for your toaster.
Step-by-Step Guide to Safely Repairing Minor Frayed Toaster Cords
This guide focuses on minor repairs—superficial damage where the outer insulation is nicked, but the inner wires are intact and not exposed. For any more significant damage, please refer to the “Full Toaster Cord Replacement” section or consider replacing the appliance.
Step 1: Disconnect and Inspect Thoroughly
Begin by unplugging your toaster from the wall outlet. This step is non-negotiable. Once disconnected, carefully examine the frayed area of the cord. Look closely to determine if the damage is truly superficial—meaning only the outermost layer of insulation is affected, and no actual copper wire strands are visible or broken. If you see bare copper or feel a noticeable weakness, proceed with extreme caution, as the damage may be beyond a simple patch.
Step 2: Prepare the Damaged Section
For a minor nick in the outer jacket, gently clean the area with a dry cloth to remove any dust or debris. If there’s a small flap of loose insulation, you can carefully trim it smooth with wire cutters, ensuring you do not cut into the inner insulation or actual wires. The goal is to create a clean surface for your repair material.
Step 3: Insulate and Secure the Repair
- Option 1 (For superficial nicks without exposed wires – use with caution): Electrical Tape. Wrap several layers of high-quality, UL-listed electrical tape tightly around the damaged area. Extend the tape a few inches beyond the fray on both sides to ensure a secure seal. The wrap should be snug and smooth, without any gaps.
- Option 2 (Preferred for minor fraying or small, non-structural insulation damage): Heat-Shrink Tubing. This method provides a more durable and professional-looking repair.
- Ensure the diameter of your heat-shrink tubing is slightly larger than your cord but will shrink to fit snugly.
- Slide a piece of heat-shrink tubing over one end of the cord, ensuring it covers the entire damaged area and extends a few inches beyond on either side.
- Using a heat gun (on a low setting initially, increasing as needed), slowly and evenly apply heat to the tubing. The tubing will shrink and conform tightly to the cord, creating a protective, insulated seal. Move the heat gun continuously to prevent scorching.
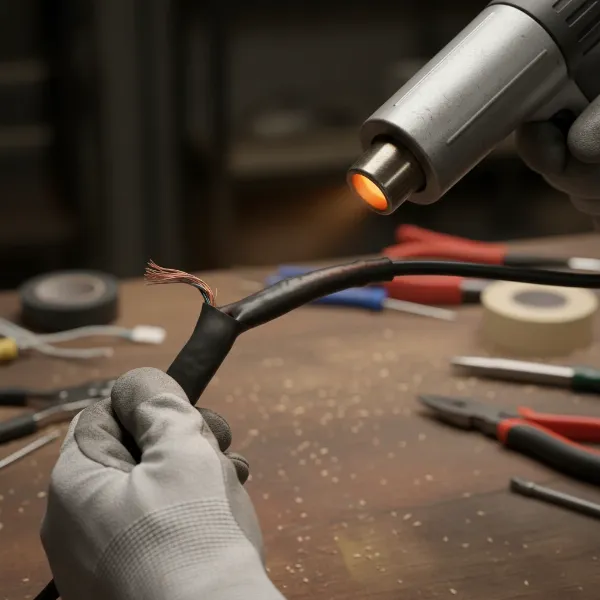 Hands using a heat gun to apply heat-shrink tubing to a minor cord fray
Step 4: Final Checks
Once the repair is complete and cool to the touch, visually inspect it to ensure it’s smooth, fully insulated, and securely in place. Gently flex the cord around the repaired section to check for any loose spots or areas where the repair material might detach. Before plugging it back in, make a mental note to monitor the repaired section for any signs of heat or further damage during subsequent uses.
Full Toaster Cord Replacement: When and How
While minor repairs can sometimes extend the life of a cord, there are situations where a full power cord replacement is the safest and most reliable solution.
Deciding on a Full Cord Replacement
A full cord replacement is highly recommended, or even necessary, if:
- The inner wires are clearly exposed or cut.
- The damage is extensive, running several inches along the cord.
- The fraying occurs at either end—where the cord meets the plug or enters the toaster body. These areas experience the most stress, and a repair here is unlikely to be durable or safe.
- The existing cord shows signs of melting, burning, or discoloration, indicating internal heat issues.
- You are uncomfortable with the uncertainty of a patched repair on a high-wattage appliance.
Steps for Replacing an Entire Toaster Cord (Professional Guidance Recommended)
Replacing an entire toaster cord is more involved and often requires opening the appliance, which can void warranties and should ideally be performed by someone with electrical knowledge. If you’re not an experienced DIYer, consulting a qualified appliance technician or electrician is strongly advised.
- Disconnect Power: Unplug the toaster.
- Access Internal Wiring: Carefully open the toaster casing. This usually involves removing screws from the bottom or sides. Document the disassembly process with photos to aid reassembly.
- Identify Connections: Locate where the old power cord wires connect to the toaster’s internal circuitry. Typically, there will be two or three wires (hot, neutral, and sometimes ground) connected to terminals. Note the color coding and their respective connections precisely.
- Remove Old Cord: Disconnect the old cord from these terminals. Pay close attention to how they were secured (e.g., screw terminals, crimped connectors).
- Prepare New Cord: Strip about ½ inch of insulation from the ends of the new replacement cord’s wires, exposing the copper strands. Ensure the new cord is rated appropriately for toaster use (gauge, insulation type).
- Install New Cord: Connect the new cord’s wires to the corresponding terminals inside the toaster, matching the color coding exactly (e.g., black to black, white to white, green/bare to ground). Ensure connections are tight and secure, with no stray wire strands that could cause a short.
- Secure and Reassemble: Use a strain relief clamp if available to secure the new cord where it enters the toaster casing, preventing future tugging from damaging the internal connections. Carefully reassemble the toaster casing, ensuring all screws are tightened and no wires are pinched.
- Test Safely: Plug the toaster into a Ground Fault Circuit Interrupter (GFCI) outlet if available, as it offers added protection. Test the toaster. Listen for unusual sounds, watch for sparks, and feel for excessive heat around the cord or toaster body. If anything seems amiss, unplug immediately.
Prolonging the Life of Your Toaster Cord
Prevention is always better than repair, especially when it comes to electrical safety.
Best Practices for Cord Care
- Avoid Kinking and Bending: Never coil the cord tightly or bend it at sharp angles. This can stress the internal wires and insulation.
- Proper Storage: When not in use, lightly coil the cord and store it in a way that prevents it from being crushed or tangled.
- Keep Away from Heat and Water: Ensure the cord does not come into contact with hot surfaces (like the toaster itself during operation) or water.
- Protect from Pets and Foot Traffic: Keep cords out of reach of pets that might chew them and away from high-traffic areas where they could be tripped over or stepped on.
Regular Inspection
Make it a habit to routinely inspect all your appliance cords for signs of wear and tear, including your toaster cord. Look for:
- Cracks or abrasions in the outer insulation.
- Discoloration or melted areas.
- Kinks or severe bends.
- Any stiffness or brittleness in the cord material.
Address any issues promptly, even minor ones, to prevent them from escalating into major safety hazards.
Conclusion
A frayed toaster power cord demands immediate attention. While minor superficial damage can sometimes be safely addressed with caution and the right materials, the safest and most reliable approach for significant fraying—especially when inner wires are exposed or cut—is often a complete cord replacement or, if uncertain, replacing the appliance entirely. Electrical safety is not an area for compromise. Prioritize the well-being of your home and family by taking proactive steps. When in doubt, consult a qualified electrician or appliance technician who can provide expert guidance. What steps will you take today to ensure your kitchen appliances are truly safe?
Frequently Asked Questions
Can I just use electrical tape for a frayed toaster cord?
For very minor, superficial nicks where only the outermost insulation is scratched and no inner wires are exposed, electrical tape can offer a temporary, cautious fix. However, for any significant fraying or visible inner wires, electrical tape is generally not sufficient and poses a fire and shock risk. Heat-shrink tubing offers a more durable repair for minor damage.
How do I know if my toaster cord is too damaged to repair?
Your toaster cord is likely too damaged to repair if you see exposed copper wires, the cord is cut or severely kinked, there are signs of melting or burning, or the damage is very close to the plug or the toaster body. In these cases, replacement of the cord or the entire appliance is strongly recommended for safety.
What tools do I need to replace a toaster cord?
To replace a toaster cord, you’ll typically need wire cutters/strippers, a screwdriver set (to open the toaster casing), a new replacement cord of the correct gauge, and possibly wire nuts or butt connectors. A multimeter can be useful for testing continuity. For safety, always unplug the toaster first.
Is it safe to replace a toaster cord myself?
Replacing a toaster cord involves working with internal electrical components and should only be attempted if you have experience with electrical wiring and understand basic safety protocols. If performed incorrectly, it can create significant shock and fire hazards. When in doubt, it is always safest to consult a qualified electrician or an appliance repair professional.
Why do toaster cords have such short lengths?
Toaster cords are often intentionally kept short for safety reasons. A shorter cord reduces the risk of tripping hazards, prevents the toaster from being placed too close to a sink or other water source, and minimizes the chance of the cord dangling where children or pets might reach it.