There’s nothing quite like the smell of perfectly golden toast in the morning, a simple pleasure that can be abruptly interrupted by a faulty toaster. When your browning knob dial breaks, whether it’s stiff, spinning aimlessly, or completely detached, it can transform a minor inconvenience into a major breakfast disruption. As experts in the world of toasters, we understand this frustration deeply. This guide will walk you through common issues and provide practical, step-by-step solutions to bring your toaster’s browning control back to life, ensuring you can once again achieve that ideal level of crispness.
Understanding Common Browning Knob Issues
Before diving into repairs, identifying the specific problem with your browning knob is crucial. Different symptoms often point to different underlying causes and, consequently, different solutions.
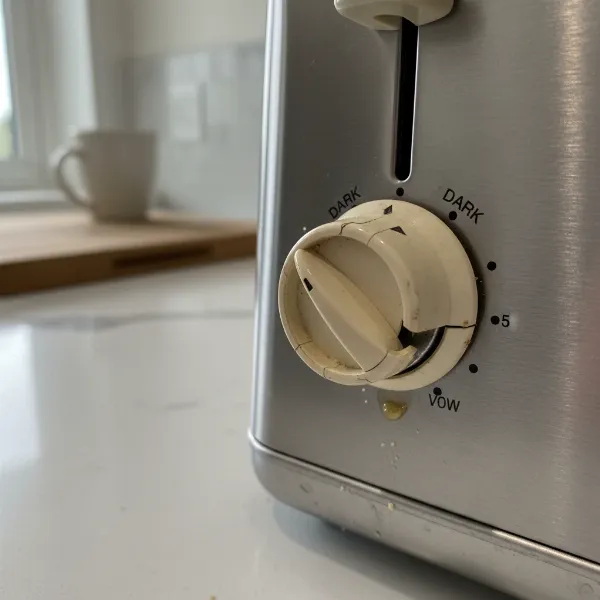 Close-up of a toaster browning knob showing signs of common issues like stiffness, spinning, or physical damage.
Stiff or Stuck Browning Knobs
Have you ever tried to adjust your toast’s shade only to find the dial won’t budge? A stiff or stuck browning knob is a common complaint. This usually indicates an obstruction or a lack of lubrication preventing the knob from rotating smoothly. Over time, crumbs, grease, and other debris can accumulate around the knob’s shaft, creating friction or outright jamming the mechanism.
- Pros: Often an easy fix with simple cleaning.
- Cons: Can sometimes be a symptom of internal damage if forced.
- Best for: Minor debris accumulation or dry shafts.
|
Our Picks for the Best Toaster in 2026
As an Amazon Associate I earn from qualifying purchases.
|
||
| Num | Product | Action |
|---|---|---|
| 1 | Touch Screen Toaster - 4 Slice, 2 Extra Long Slots - 5 Bread Types and 6 Browning Levels - Defrost, Reheat, Favorite, & Single Slot Modes - For Toast, Bagels, & Waffles – White |

|
| 2 | Amazon Basics 2 Slice Toaster, With 6 Browning Settings, Extra Wide Slots For Bagels and Special Breads, Removable Easy-to-Clean Crumb Tray, Cancel/Defrost/Bagel Buttons, 900W, Black & Silver |
|
| 3 | bella 2 Slice Slim Toaster, Fits-anywhere™ Kitchenware, 6 Setting Shade Control with Reheat & Cancel Buttons, Fits sourdough, 10” Long Slot, Anti Jam & Auto Shutoff, 900 Watt, Blossom |
|
| 4 | KEYWIND VTG RIC DELUXE LONG SE |
|
| 5 | STRING SET BASS STD 45w 55w 75w 105w |
|
| 6 | bella 2 Slice Slim Toaster, Fits-anywhere™ Kitchenware, 6 Setting Shade Control with Reheat & Cancel Buttons, Fits sourdough, 10” Long Slot, Anti Jam & Auto Shutoff, 900 Watt, Oatmilk |
|
| 7 | bella 2 Slice Slim Toaster, Fits-anywhere™ Kitchenware, 6 Setting Shade Control with Reheat & Cancel Buttons, Fits Sourdough, 10” Long Slot, Anti Jam & Auto Shutoff, 900 Watt, Seaglass |
|
| 8 | Elite Gourmet ECT1027B Cool Touch Toaster with 6 Temperature Settings & Extra Wide 1.25" Slots for Bagels, Waffles, Specialty Breads, Puff Pastry, Snacks, ETL Certified, 2 Slices, Black |
|
| 9 | bella 2 Slice Slim Toaster, Fits-anywhere™ Kitchenware, 6 Setting Shade Control with Reheat & Cancel Buttons, Fits Sourdough, 10” Long Slot, Anti Jam & Auto Shutoff, 900 Watt, Surf |
|
| 10 | bella 2 Slice Slim Toaster, Fits-anywhere™ Kitchenware, 6 Setting Shade Control with Reheat & Cancel Buttons, Fits sourdough, 10” Long Slot, Anti Jam & Auto Shutoff, 900 Watt, Plum |
|
Knob Spins Freely But Doesn’t Change Setting
This issue is particularly vexing: the knob turns, but your toast emerges either too pale or too dark, with no discernible change from your adjustments. This suggests a disconnection between the knob and the internal mechanism it’s meant to control. The knob might have stripped internally, or its connection to the control shaft could be loose or broken.
- Pros: Repairable if the internal component isn’t severely damaged.
- Cons: Might require replacement parts if the knob or shaft is stripped.
- Best for: Misaligned knobs or minor stripping.
Physically Broken Browning Knobs (Cracked, Snapped, or Detached)
Physical damage is perhaps the most obvious problem. A knob that is cracked, snapped in half, or has completely detached from its shaft is clearly in need of attention. This type of damage typically results from accidental impact, excessive force during use, or material fatigue over many years.
- Pros: Often a clear path to repair or replacement.
- Cons: Requires either finding a compatible replacement or attempting a sturdy DIY fix.
- Best for: Direct physical damage to the knob itself.
Step-by-Step Troubleshooting and Repair Guide
Repairing your toaster’s browning knob can often be a straightforward DIY project. Always prioritize safety before starting any repair.
Safety First: Unplug Your Toaster
This step is non-negotiable. Before you begin any inspection or repair work, always unplug your toaster from the electrical outlet. This eliminates the risk of electric shock and ensures your safety throughout the process.
Initial Inspection: The First Line of Defense
Start with a thorough visual inspection. Examine the area around the browning knob for visible debris, crumbs, or any signs of physical damage like cracks or chips on the knob itself. Sometimes, the simplest problem is the easiest to overlook. Gently try to pull the knob off the shaft – some are designed to simply slide on and off, while others may have a small set screw.
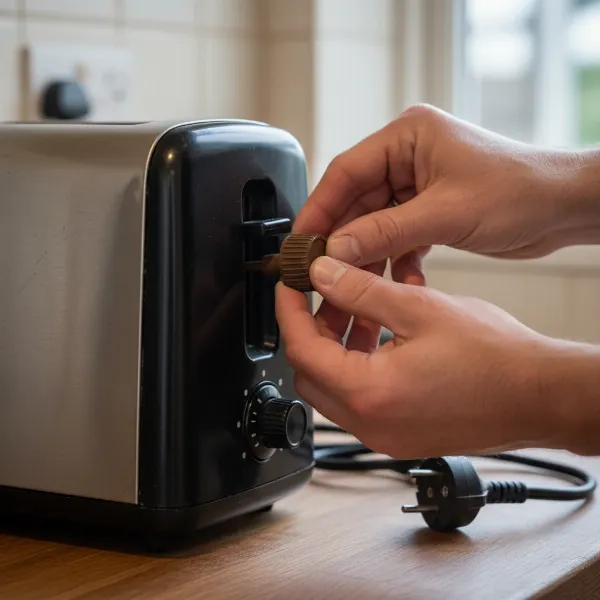 Hand gently pulling a browning knob off a toaster for inspection and cleaning.
For Stiff or Stuck Browning Knobs
If your knob feels stiff or won’t turn, friction or obstruction is likely the culprit.
- Remove the Knob (if possible): If your knob slides off, carefully remove it. If it has a set screw, unscrew it gently before pulling the knob off.
- Clean the Area: Use a soft brush, a toothpick, or a blast of compressed air to clear any crumbs, grease, or sticky residue from around the control shaft and the base of the knob. A damp cloth (ensure it’s not dripping wet and the toaster is unplugged) can wipe away stubborn grime on the exterior.
- Lubricate the Control Shaft: Apply a tiny amount of food-grade silicone lubricant to the control shaft – the small metal stick the knob attaches to. Do not overdo it; a small drop goes a long way. This helps reduce friction and allows for smoother operation.
- Reassemble and Test: Carefully slide the knob back onto the shaft, ensuring it’s aligned correctly. If there’s a set screw, tighten it just enough to secure the knob without overtightening, which could strip the threads. Give the knob a few turns to check for smooth rotation.
For Knobs Spinning Freely But Not Engaging
This issue indicates a problem with the connection between the knob and the internal mechanism.
- Remove the Knob: As before, remove the knob from the control shaft.
- Inspect the Knob’s Interior: Look inside the knob where it connects to the shaft. Is it cracked, stripped, or rounded out? If the knob’s inner bore is damaged, it won’t properly grip the shaft.
- Inspect the Control Shaft: Examine the shaft itself. Is it flat-sided (D-shaped) or splined? Is it broken, bent, or otherwise damaged?
- Realignment: If both the knob and shaft appear intact, the knob might simply be misaligned. Ensure the flat side of the shaft (if applicable) aligns perfectly with the corresponding flat side inside the knob. Push the knob firmly onto the shaft until it’s securely in place.
- Addressing Stripped Connections:
- Temporary Fix: If the knob is only slightly stripped, a small piece of electrical tape wrapped around the shaft before reattaching the knob might provide enough grip.
- DIY Repair (for the knob): If the internal bore of the plastic knob is stripped, you might try a DIY repair using a sleeve. Acquire a brass or aluminum tubing of a diameter that fits snugly over the control shaft. Cut a small piece of this tubing to the length of the knob’s internal bore. You can then insert this sleeve into the knob and secure it with a strong adhesive, effectively creating a new, stronger bore.
- Replacement: If the stripping is severe, or if the control shaft itself is damaged (which is less common for the shaft itself to be stripped than the plastic knob), a replacement knob or potentially a more involved internal repair might be necessary.
For Physically Broken Browning Knobs
When the knob itself is cracked, snapped, or completely broken, you have a few options.
-
Temporary Solutions:
- For immediate use, you can sometimes use a pair of pliers, a fork, or a flathead screwdriver to carefully turn the control shaft. This is not a long-term solution but can get you through a breakfast crisis.
“Necessity is the mother of invention, and sometimes a butter knife is all you need to get that toaster working for one more morning.” – Chef Antoine Dubois, Culinary Equipment Specialist
- For immediate use, you can sometimes use a pair of pliers, a fork, or a flathead screwdriver to carefully turn the control shaft. This is not a long-term solution but can get you through a breakfast crisis.
-
DIY Permanent Fixes:
- Superglue and Baking Soda: For cracked plastic knobs, a mixture of superglue and baking soda can create a surprisingly strong bond. Apply superglue to the crack, then sprinkle baking soda over it. The baking soda acts as a filler and accelerator, creating a hard, plastic-like repair.
- Epoxy Putty or J-B Weld: These two-part epoxies are excellent for bonding broken plastic or metal components. Mix the epoxy according to the manufacturer’s instructions, apply it to the broken sections, and firmly press them together. Allow ample time for the epoxy to cure completely. When repairing a knob that broke around the shaft, you can use epoxy putty to rebuild the broken area, ensuring it fits the metal shaft.
- Sleeving with Metal Tubing: As mentioned for stripped connections, if the knob has split or broken where it meets the shaft, carefully sleeving the inside of the knob with a piece of brass or aluminum tubing, secured with strong adhesive, can restore its integrity and provide a durable connection.
-
Finding a Replacement Knob:
- Contact the Manufacturer: The most reliable way to find a matching replacement knob is to contact the toaster’s manufacturer directly. Provide them with your toaster’s model number.
- Online Retailers/Parts Stores: Websites specializing in appliance parts often carry universal knobs or specific brand replacements. You might need to measure your control shaft to find a compatible universal knob.
- 3D Printing: If you have access to a 3D printer or a friend who does, it might be possible to print a custom replacement knob, especially for older or discontinued models where original parts are scarce.
When to Call a Professional or Replace Your Toaster
While many browning knob issues are DIY-friendly, there are times when professional help or even a full replacement is the more sensible option.
- Complex Internal Electrical Issues: If the browning knob turns perfectly fine, but the toaster still isn’t heating or consistently burning toast, the problem might lie with the internal thermostat, heating elements, or wiring. These electrical issues can be dangerous to troubleshoot without proper expertise and tools.
- Cost of Repair vs. Replacement: Weigh the cost of replacement parts and your time against the price of a new toaster. For older, inexpensive models, buying a new unit might be more economical than extensive repairs.
- Safety Concerns: If you are unsure about any step or feel uncomfortable working with electrical components, it’s always best to consult a qualified appliance technician. Your safety should always be the top priority.
Tips for Preventing Future Knob Breakage
Prevention is always better than cure. By adopting a few simple habits, you can extend the life of your toaster’s browning knob:
- Gentle Handling: Avoid forcing the knob or twisting it aggressively. Toaster knobs are often made of plastic and can break under undue stress.
- Regular Cleaning: Periodically clean around the knob and inside the toaster to prevent crumb buildup from jamming the mechanism.
- Proper Storage: If storing your toaster, ensure nothing heavy is placed on top of or against the browning knob that could cause damage.
Conclusion
A broken browning knob doesn’t have to spell the end for your beloved toaster. From sticky dials caused by stray crumbs to physically broken components, many issues can be resolved with a little patience and the right approach. By understanding the problem and following the steps outlined in this guide, you can often restore full functionality to your toaster, ensuring consistent, perfectly toasted bread every time. Taking a moment to troubleshoot and repair your appliance not only saves money but also extends the life of a valuable kitchen companion.
What steps will you take to ensure your toaster serves up perfect toast for years to come?
Frequently Asked Questions
Can I use any lubricant on my toaster knob?
No, it is highly recommended to use a food-grade silicone lubricant. Other lubricants may not be safe for use around food preparation areas and could attract more dust and debris, or degrade the plastic components over time.
How do I know if my toaster knob is stripped internally?
If the knob turns easily but the internal control shaft does not move or the browning setting doesn’t change, the inside of the knob where it grips the shaft is likely stripped or rounded out.
Is it safe to open up my toaster to fix the knob?
Only open your toaster if you are comfortable with basic appliance repair and have unplugged the unit. Most knob repairs are external, but if internal access is required, proceed with extreme caution and consider professional help if unsure.
Where can I find replacement knobs for older toaster models?
For older models, contacting the original manufacturer is a good first step. If unsuccessful, online appliance parts retailers, universal knob suppliers, or even 3D printing services might offer viable alternatives.
My toaster knob turns, but the toast still burns. What’s wrong?
If the knob seems to be turning correctly but the browning control isn’t functioning, the issue likely lies with the internal thermostat or heating element control rather than the knob itself. This usually requires more advanced electrical troubleshooting.